Showing posts with label Stampin' Up. Show all posts

Sunday, March 29, 2015

Stamping Time

During the last couple of weeks I've really gotten back into making cards. I brought a lot of my supplies upstairs, where it's warmer and where I can watch HGTV while I work. My daughter and her family came up one weekend and asked if we could make cards. She suggested that we use some of our washi tape for decorations. My final bit of inspiration is Pinterest. I am hooked on it. I can search for cards by using the name of the stamp set I want to use and get all kinds of inspiration.
So here are some of the cards I've made recently. You can click on the card to see my inspiration from Pinterest, if there is a specific one.


"Sheltering Tree" stamp set from Stampin' Up. The blue with white polka dots is paper.


Same stamp set but the black and white polka dots is a piece of  washi tape.


The bird is from the "A Happy Thing" stamp set by Stampin' Up. 
The words are a stamp by The Last Word.


"Big Day" stamp set by Stampin' Up.


The cake and "Happy Birthday" stamps are also from "Big Day" set by Stampin' Up. The diagonal striped prints are from 3 different rolls of washi tape.


"So Many Scallops" stamp set by Stampin' Up.


"Celebrate Today" stamp set by Stampin' Up plus washi tape.


 "Best Day Ever" stamp set by Stampin' Up.


"Morning Cup" stamp set - Stampin' Up.


"Thoughts and Prayers" stamp set by Stampin' Up.


"Lotus Blossom" stamp set - Stampin' Up.


"A Happy Thing" stamp set - Stampin' Up.


The tree is a stamp from Northwoods Rubber. The words are a stamp by Hero Arts.

_________________________________________________________________________________
The rest of these cards feature washi tape.


("Just a Note" is a Stampin' Up stamp.)


("You make me smile" is stamp by J Denami Design.)


("Happy Birthday" is a stamp by imaginations.)


(This cute little bird is from a Stampin' Up set called "Happy Together")


(This phrase is a stamp from the set called "Heard From the Heart" by Stampin' Up.)

 I am having so much fun creating cards again. I hope I inspired you to get crafty too!


Friday, January 2, 2015

Mother and Daughter Crafting

My daughter and her family came up to celebrate New Year's with us. Every time she comes to visit we always make sure we have some time to craft together. We usually prepare for the weekend by looking up potential projects online - especially on pinterest. 

Here are a few of our projects so far...


Project #1 - heart pictures. We painted white card stock, used a punch to cut out the hearts, and used Mod Podge to glue the hearts to another piece of card stock.  Click here for out inspiration - we used hearts instead of circles)


Here's Carrie's finished picture . . .


and here's mine.


Project #2: Word plaques. We used the silhouette to cut the words out of white card stock. Then we applied washi tape to another piece of card stock and layered the cut out piece on top so the tape shows through. On the second one I just put patterned card stock behind the word "Love." (Click here for our inspiration.)


Project #3: Cards using my new Stampin' Up feather bundle (stamps and framelit dies). (Click here  and here for our inspiration)


And here are our finished cards.


We have one more day to do some crafting. I wonder what our project will be.....

Tuesday, July 22, 2014

Stampin' Time

The hot weather we've been having has been good for me - because it has driven me downstairs to my craft room where it is cooler. It's been a while since I've felt like crafting, but now that I've begun, I don't want to stop!

I've been having fun looking on Pinterest for card ideas to use as inspiration, and then even more fun creating my own cards.

If you click on each picture you will see one of my inspiration pins for each card. Of course, there were lots more. You just have to love Pinterest!


Sunday, March 9, 2014

Birthday Cards

I am becoming obsessed with using the combination of yellow, black and white when I make cards. My inspiration came from some cards on Pinterest:

http://www.pinterest.com/pin/146155950381389060/

http://www.pinterest.com/pin/146155950381396129/

Here are my cards:


Here are a couple more new birthday cards.


How do you like them?

Wednesday, February 26, 2014

Holy Scrap

Holy Scrap is the name of a scrapbooking retreat that I went to last weekend. It was at a Bible Camp, and it was organized by some of the teachers in my school district. This was my second year at Holy Scrap, and I had a great time. Unfortunately, I didn't have enough pictures printed to be able to scrapbook. Fortunately, I did have lots of card supplies and ideas, so I spent the weekend making cards.
When we first got to the camp, we checked in at the room where we would spend the weekend being creative. We were all greeted by the sight of gorgeous paper flowers. Each one was on a wooden kabob skewer, and was stuck into an insulated cup. Each flower had a name on it, and that showed us where our place would be for the weekend. Here's my flower (back at my house).


We had several Make-And-Take projects to do over the weekend. Here is one - this card is so easy to make!


Just cut 4-5 strips of coordinating paper - make them 1 1/2 inches by 4 inches. Then cut them diagonally, corner to corner. Cut a piece of white paper 5 inches by 3.75 inches. Either score or mark the paper one inch from the bottom edge. Then score or mark down the middle, from the top to the first scoring mark.  Use the middle mark to place the first triangle, with the point at the 1 inch score mark, in the middle. Glue (or use tape runner) the triangles one by one across the card. Trim off the excess around the sides. Cut coordinating rectangle 5.25 inches by 4 inches. Glue white card with triangles to the colored rectangle. Fold cardstock for card (8.5 inches by 4.25 inches) in half. Glue colored rectangle piece to the top of the card.  Adhere a strip of Stampin' Up's sticky tape over the scoring mark one inch from the bottom and stick ribbon to the tape.  If you want to, you can stamp a message below the ribbon.


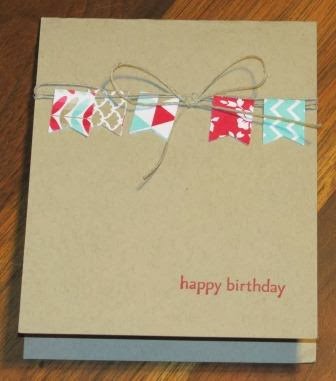
 Here's the second Make-And-Take card. We used a Stampin' Up punch to make the flags, tied thin twine around the cardstock and draped flags over the twine. We did use some glue dots to keep the flags on the twine. So simple!

Here are some of the cards I made -


One other component of the weekend was the scrapbook challenge. Actually, there were several challenges over the course of the weekend. I missed the first one, which was to make a black and white layout.
The second challenge was to use a pair of decorative scissors in our project or layout. Here's the card I made for that challenge. Sorry for the quality of the picture - the card is actually white.


The last challenge was to look through scrapbooking/card making magazines to find inspiration and make a project/layout based on the inspiration piece.  I saw a trifold card idea, and made this card-


It was a great weekend. My hope is that next year my daughter will be able to go with me to the Holy Scrap weekend.